LIGHTBELT PI
 |
|
| Luminous / Lichtstrom | 1.000 lm/m |
| Max. length / max. Länge | 100 m |
| Shortness / Kürzbarkeit | 0,5 m |
| 20 lux - shaft cross-section (calculated) / 20 Lux - Schachtquerschnitt (berechnet) | max. 18 m² |
| 50 lux - shaft cross-section (calculated) / 50 Lux - Schachtquerschnitt (berechnet) | max. 7 m² |
| Power consumption / Leistungsaufnahme | 9 W/m |
| Number of LEDs/m / Anzahl LEDs/m | 84 LED/m |
| Working life under normal operating conditions / Lebensdauer bei normal Betrieb | 20.000 h |
| Certificates / Zertifikate | CE, ROHS, REACH, EMC |
| Voltage / Stromspannung | 220-240V AC / 50-60Hz |
| IP protection class / IP Schutzart | IP 54, IP 67 (optional) |
| Color temperature / Farbtemperatur | 6.000 K |
| Beam angle / Abstrahlwinkel | 120° |
| Operating temperature strip / Betriebstemperatur Schlauch | +20°C to +40°C / +20°C bis +40°C |
| Shaft ambient temperature / Umgebungstemperatur Schacht | -20°C to +40°C / -20°C bis +40°C |
| Cross-section / Querschnitt | 16 x 11 mm |
| Weight without power cord / Gewicht ohne Zuleitung | 0,18 kg/m |
| Type of mounting / Befestigungsart | 2 screws / 2 Schrauben |
| Material light strip / Material Lichtschlauch | PVC, self-extinguishing / PVC, selbstverlöschend |
| Protection class / Schutzklasse | II |
| Standards / Normen | DIN EN 81-20, DIN EN 81-72, DIN EN IEC 60598-1 |
| Rectifier / Gleichrichter | on PCB (in strip) / auf PCB (im Schlauch) |
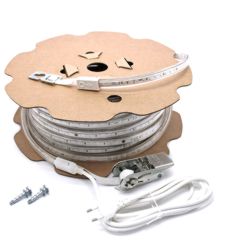
Installation of LIGHTBELT PI
Fixing at the top shaft point
Installing LIGHTBELT PI couldn’t be easier! A single screw is sufficient to securely fix the light strip to the top mounting point.
- Drill a Ø6 mm hole in the desired position.
- Screw the special screw supplied directly into the masonry without a dowel.
Tool: Use an impact wrench with a TORX TX30 bit.
Installing at the bottom shaft point
The installation of LIGHTBELT PI is completed by simply attaching it with the ratchet:
- Mark the drilling point: Transfer the position of the ratchet to the wall using a marking pen.
- Drill a Ø6 mm hole at the marked position.
- Attaching the ratchet: Screw it directly into the masonry using the special TX30 screw supplied – no dowel needed.
- Tensioning the light strip: Pull the strip tight with the ratchet until it is secure.
- Connect & light up: Plug it into the socket – and the lift shaft is bathed in bright, pleasant working light.
